Showing posts with label How-To-Tutorials. Show all posts

Wednesday, June 6, 2012

Video Tutorial: How to Truncate Posts in Blogger

I'm changing things up a bit and sharing a video tutorial in today's post.  I got a new webcam and have more free time to edit and post for you. For those that prefer written instructions, please refer to the copy below.  Hope you enjoy!


Video link here for those reading by email :)

If your blog is powered by blogger, you may have wondered if there was a way to truncate posts without changing your template entirely.  Good news! There is an easy way to truncate posts (moving forward, and you can also edit previous posts to truncate those as well if you wish). 

This tutorial will be short and sweet, because it’s just that easy! Wondering why you should bother truncating posts? It decreases load time (which may help with SEO) and may increase page views – both good things.  I came across the idea of truncating via the lovely Likely Lola here.  I’m a new reader to her blog and am enjoying it.
How to Truncate Posts in Blogger

  1. After you’ve composed your post, decide what place is best to truncate within your copy.  Do you want to truncate after a certain line number, or do you prefer to vary the truncation based on the flow of the entry? This method works in either case.
  2. Place your cursor where you’d like to truncate.
  3. Look for the truncation icon – you’ll be surprised to see it’s been in front of you! Click the truncate icon.


 Afterwards, your text (in writing/draft mode) should look like this:


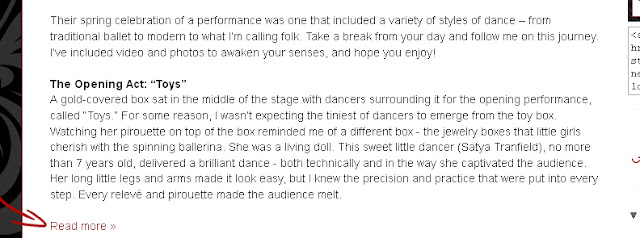
4. Publish, update or schedule your post. The finished product should look like this (notice the "read more" in red?):


Laura is a marketing professional and blogger who has been active in social media since 2005.  If you enjoyed this post, please consider subscribing to this blog
via Email or  RSS. Laura can also be found on Twitter (@LauraCatherineO), Facebook, and LinkedIn

Tuesday, June 5, 2012

Five Ways to Use the New Facebook Scheduler - A Must Read!


She's smiling because she LOVES the new FB scheduler ;)
If you are a Facebook page admin, I can’t stress enough just how HUGE my last post was for the way you “do” Facebook. 

To get your creative juices flowing, I’m sharing five ways to use the new Facebook scheduler to streamline your Facebook postings, save you time and engage your audience! Remember, you can schedule these out in advance (up to 6 months from now!) and let Facebook do the work for you while you carry on with your life.  Of course, you’ll want to stay posted on comments/likes/questions via the handy Facebook mobile page manager app. 

Here goes…

Five Ways to Use the New Schedule Feature in Facebook

  1. Sort through a few of your favorite photos and schedule out a status update (with accompanying photo) for each.  You could call it “Flashback Friday” or “Photo Thursday”, etc. 
  2. Gather together a few testimonials/recommendations you’ve received (via LinkedIn or otherwise) and post each one as a status update over the next few months.
  3. Ask a question.  Mark your calendar for the day the question will be posted, so that you’re sure to be available to respond to comments as they come in.  Remember, you can do this (respond to comments) via the pages app for your mobile device, too!
  4. Share a “on this day in history” update.  What milestones do you have to share? It could be anything from “On this day, exactly one year ago, I left my full-time job to pursue my creative business dreams” to “Today is National Ice Cream Day – here is one of my favorite sundae recipes (link)”.
  5. Post a link to an article you’ve found especially helpful.  Your fans enjoy reading your own content, but are just as delighted to discover what fuels your business! Share a favorite blog article, news article, DIY project, etc. with them.
I’ll be posting ideas 6 – 10 in the coming weeks as well.  In the meantime, I hope I’ve given you a few fun ideas to get you started!  Did you miss the Facebook scheduler post? It’s over here.  Best of luck.

Laura is a marketing professional and blogger who has been active in social media since 2005.  If you enjoyed this post, please consider subscribing to this blog
via Email or  RSS. Laura can also be found on Twitter (@LauraCatherineO), Facebook, and LinkedIn

Saturday, February 18, 2012

Are You Twitter Listing?

By now, you're likely tweeting away! Whether you're a twitter newbie or a veteran, Twitter lists will prove to be most helpful, especially as you grow the number of people you follow on Twitter.
Someone recently asked me how I seem to find goodness-filled tweets when I'm following 4,000 people. My answer: Twitter lists.

Thank goodness, I had enough insight when I was new on Twitter to create and use Twitter lists. Sure, it was somewhere between follower 1 and follower 1,000 that I realized how essential the lists would prove to be.  Yep, there were a few long days where I had to back-track and list each person I was following so that my streams were super-organized. 

Example: Out of 4,000 people, nearly 500 are Charleston marketing and public relations professionals.  And I have them all in their very own list.  That means at any time of the day or night, I can jump over to that list (on my computer OR phone) and see what's going on with these talented peeps.

Same goes for artists...I have close to 200 artists whom all took "Flying Lessons" with Kelly Rae Roberts in their own organized list.

Twitter gives you up to 20 lists of your very own.  Think about how your followers break down (do you tend to follow authors, inspirational folks, house and home peeps, jewelry makers, mommy bloggers, tech bloggers, etc?) - make lists and start listing! And if you're late to the list party? Trust me, it's worth adopting lists today, and even going back to list your tweeps.

Need a tutorial on how to create a Twitter list? I'm reposting a link to this updated tutorial, previously shared on this blog but still very handy.

Are we following each other? Tweet me @lauracatherineo and tell me you read this post.  I'd love to meet you!

Enjoy!

Laura is a marketing professional and blogger who has been active in social media since 2005.  If you enjoyed this post, please consider subscribing to this blog
via Email or  RSS. Laura can also be found on Twitter (@LauraCatherineO), Facebook, and LinkedIn.
 

Thursday, August 4, 2011

How to Change the Number of Posts that Appear on My Blogger Blog Homepage

One of my amazing artist friends Mary Beth Volpini asked me a question today that I thought could make a neat “Tutorial Thursday” post.  Her question was about changing the number of posts that display on her blog homepage.  So, today I wanted to share the few simple steps to change this number.  If you aren't using blogger or don't need to change this setting, be sure to scroll to the end of this post to get a peek at MB's art!

How to Change the Number of Posts that Appear on My Blogger Blog Homepage

  1. Login to Blogger
  2. Click on “Settings”.
  3. Click on the “Formatting” tab and look for the first item, which says “show at most”.
  4. Change the number from the dropdown to the number of posts you’d like to display on your main page.
  5. Be sure to click on “Save Settings” at the bottom of the page. 
You’re all set!

Be sure to visit Mary Beth’s blog.  She is an “artist, designer and mom…redesigning her life after cancer”.  Mary Beth is “Drawn to Color” and you’ll surely be touched by her beautiful mixed media artwork. I'm sharing a few of my faves below. Simply breathtaking!

Melting Colors Garden

Stand Alone

Follow Your Heart
Love

Have a great rest of your week.

Laura Catherine Otero is a marketing professional and blogger in Charleston, SC who has been active in social media since 2005.  If you enjoyed this post, please consider subscribing to this blog via Email or  RSS. Laura can also be found on Twitter (@LauraCatherineO), Facebook, and LinkedIn

Friday, July 8, 2011

How to Publish Your Own Paper.li Online Newspaper

Have you visited http://Paper.liyet? According to their website,

“Paper.li is a content curation service.  It enables people to publish newspapers based on topics they like and treat their readers to fresh news, daily.” 


I came across Paper.li many months ago but have developed an increased interest in the content sharing after being featured in a Twitter friend’s own paper.li online newspaper.  @ (Greg Shue) publishes a “#CHS #Design Daily” using paper.li, and I have been thrilled to find myself as a contributor on several occasions (example here: http://paper.li/SHUEDA/charleston-design). The best part? It’s allowed me to meet new people and has helped grow my relationship with @ and others featured in his daily paper.  A few weeks ago another Twitter friend, @ashleytcaldwell, released her own paper.li daily newspaper, The Modern Connection Daily.
Today I’m walking you through the process of creating your own Paper.li online newspaper.

I created three of my own daily papers:
The Charleston Marketers Daily,
The Dream Big #ArtDaily, and
the Charleston Local Business Daily.

These were so much fun to make, I imagine I’ll make a few more! The best part? Your daily paper is automated, and you can set up the daily tweet to run by itself as well.  I’d encourage you to create your own daily paper, especially if you’ve created lists on your twitter account.


How to Create Your Own Paper.li Daily Online Newspaper (It’s Free!)

1.       Visit http://Paper.li.

2.       Click on “Create a Paper”.

3.       Sign in with your Twitter (or Facebook) account.  I signed in with Twitter because that’s where I’m pulling my content from.

4.       Authorize Paper.li to use your Twitter (or Facebook) account.

5.       Provide your email address and click "continue". 

6.       Important! Instead of clicking on "Create Paper", we are going to customize your paper.  This will give you more control over the content and will allow you to customize the name of your paper.   To do this, click on "show me" under "Want to create a paper based on a specific topic or list of people?"
7.      Now, Create your newspaper by entering a Title.  Try to think of something short and sweet that will come across well on Twitter.


8.       If you have Twitter lists, add the Twitter List that is in line with the desired content of your paper.  For example, I have a Charleston Marketers list on my Twitter account with 450+ people in Charleston who are in marketing/pr/design/advertising.  When I created my “Charleston Marketers Daily” paper, I added my “Charleston-Marketers” list from Twitter as the content stream that would power the content of my paper. If you don't have Twitter lists related to the content you'd like to publish, consider pulling in twitter users another way (by keyword, hashtags, etc.)

9.       Select your language and click “Publish

10.       Now it’s time to set automatic publishing to your Twitter profile and/or Facebook wall.  To do this, go to your paper from the “my favorites” at the top right-hand side of paper.li when you’re logged in.

11.       Then, click on “paper settings” below your profile at the far top right.
12.   Select the time of day (and time zone) when you’d like your paper to be published and click “save settings”.
13.   Click over to the “promote” tab and make sure “automatically tweet to all your followers” to publish your paper to your Twitter followers (max once per day).

Congratulations! You’ve just created your very own customized online newspaper.


Laura Catherine Otero is a marketing professional and blogger in Charleston, SC who has been active in social media since 2005.  If you enjoyed this post, please consider subscribing to this blog via Email or  RSS. Laura can also be found on Twitter (@LauraCatherineO), Facebook, and LinkedIn

Thursday, June 30, 2011

How to Give Someone "+K" on Klout.com


Have you created your profile on Klout.com yet?  I’ve talked about Klout in this space before.  Klout is a free service that “identifies influencers on topics across the social web.”  I’ve noticed a few neat features from Klout recently. The first was Klout “perks”.  I talked about a free Klout “perk” I received over here.  Just a few weeks ago, I came across a new “+K” feature on Klout. 

So, what exactly does it mean to give someone a “+K” score?
A "+K" reminds me a little of a “recommendation” on LinkedIn, but it only takes a moment and you can tweet about it!  Klout recommends that you give someone a “+K” if that person has influenced you about a particular topic lately.  Today on “Tutorial Thursday” I’m going to walk you through the process of giving someone a “+K” on Klout.com.

How to give someone a "+K" on Klout.com:
  1. Login to your personal Klout profile.  If you don’t have an account on Klout yet, you can easily create one from their homepage. 
  2. In the search box on the top right-hand side of the Klout screen, type in the twitter username (“handle”) of the person you’d like to give a +K score to. 
  3. This will bring up his or her profile on Klout.  Look for the area that says “influential about” on the user’s Klout summary page.  It will appear next to “influencer of” and below his/her profile. 
  4. Click on “see all” in the “influential about” area. This will bring up the full list of topics Klout has identified as being areas this person is influential about.
  5. Look for the “Give +K” button below the topic, such as “marketing” or “blogging”, etc.  Click on the “Give +K” button to give this person a “+K” for the chosen topic.
  6. In the pop-up window, click on “tweet” or “share” to let this person know you gave him/her a “+K”.
     
Laura Catherine Otero is a marketing professional and blogger in Charleston, SC who has been active in social media since 2005.  If you enjoyed this post, please consider subscribing to this blog via Email or  RSS. Laura can also be found on Twitter (@LauraCatherineO), Facebook, and LinkedIn

Thursday, May 26, 2011

How to Link Facebook to Twitter: a "Tutorial Thursday" post


Today's "Tutorial Thurs" post covers how to link your Facebook business page status updates to your Twitter account.  Please note, this tutorial is for those who manage business pages on Facebook, and doesn't work for your personal page.

Linking your Facebook business page to Twitter is a time-saving tool.  Nothing replaces a carefully crafted tweet...but this is a good option for those who may otherwise not have the time to update in both places. 

How to Link Your Facebook Business Page to Twitter:

1. Login to Facebook (also login to Twitter if you have tabbed navigation, otherwise, you can log into twitter on Step 4)

2. Visit http://www.facebook.com/twitter

3. Click on "link to Twitter" for the Facebook business page you'd like to link to Twitter


4. Click on "authorize app" on the Twitter screen that appears. After the link occurs, you'll be taken back to Facebook (the Facebook.com/twitter page).  


5. Click on "edit settings" to specify what items you'd like to appear on Twitter (status updates, photos, video, links, notes, events, etc.)


You're all set! Your Facebook business page posts will now appear on your Twitter page.

If you're looking for other time-saving tips, you may also enjoy automatically publishing your blog posts to Facebook and/or Twitter via Twitterfeed.  The name "Twitterfeed" suggests it's a twitter-based service, but they handle Facebook publishing, too! This is another time-saver that works well for those who wouldn't otherwise be able to promote blog posts over on Facebook/Twitter due to time constraints.  Again, nothing replaces you posting/promoting blog posts Facebook yourself, but this is still a good solution.  That post is over here: http://strategiconlinemarketing.blogspot.com/2011/02/how-to-connect-your-blog-to-facebook.html

Laura Catherine Otero is a marketing professional and blogger in
Charleston, SC who has been active in social media since 2005.  If you enjoyed this post, please consider subscribing to this blog via Email or  RSS. Laura can also be found on Twitter (@LauraCatherineO), Facebook, and LinkedIn

Tuesday, March 29, 2011

How to Import Contacts on Twitter

Did you know you can import contacts from Yahoo, Gmail, LinkedIn, and Aol on Twitter? It’s “Twitter Tuesday,” and I would like to give a shout-out to a brand-new Tweeter, @NapkinWizard, before I share a handy tutorial on how to import contacts on Twitter.

It’s been so much fun for me to help Jimmy (@NapkinWizard) discover the many great features of Twitter.  I’ve written about getting started on Twitter here before, along with nearly 30 other Twitter-related posts, so you can tell it’s something that I truly see the benefit in and enjoy using.   I set Jimmy’s Twitter account up for him, and then we spent a little over an hour on the phone walking through the various features of Twitter so he could begin to feel comfortable with tweeting.  It was such fun to hear him “get it” when walking through the space.  

One thing we talked about was how to “find” people to follow on Twitter.  Where do you start? I recommend looking for your personal friends/colleagues on Twitter first.  Have you done this? If you started tweeting some time ago, it may be a good idea to visit this feature again, since Twitter may have added a few new import options since you joined (such as LinkedIn, etc.).

How to Find Import Friends (Contacts) on Twitter:
Locate friends, family, and colleagues on Twitter with it’s one-click import feature. Steps below.

  1. Visit this page: http://twitter.com/#!/who_to_follow/import to discover which of your friends are already using Twitter. It will help you import your contacts from Gmail, Hotmail/Messenger, Aol, Yahoo, and even LinkedIn.
  2. Choose the service you’d like to import contacts from.
  3. Login to the service (if promoted) or grant access
  4. Follow friends by clicking on the “follow” button.
Twitter added LinkedIn import since the last time I searched for friends, so I found a few new folks to follow.  I hope you also have great success with this neat tool. Be sure to follow @NapkinWizard if you're on Twitter.  He's a friend of @EtiquetteExpert (another must-follow!). 

Happy Tweeting!

Laura

Laura Catherine Otero is a marketing professional and blogger in Charleston, SC who has been active in social media since 2005.  If you enjoyed this post, please consider subscribing to this blog via Email or  RSS. Laura can also be found on Twitter (@LauraCatherineO), Facebook, and LinkedIn

Thursday, March 10, 2011

How to Add Pages to Blogger Blog: A "Tutorial Thursday" Post


If you have a blog on blogger.com, did you know that you have the ability to create several “pages” within your blog? Adding pages makes your blog look and feel more like a website! Even better, no advanced technical ability or html knowledge is required.  In today's "Tutorial Thursday" post we'll cover how to add pages to your blogger blog. 

How to Add Pages To Your Blogger Blog:
  1. Login to Blogger
  2. Click on “settings” from your dashboard
  3. Click on the “posting” tab

    Adding a page to your blogger blog
  4. Click on the “edit pages” tab (this will take you away from your blank post, which is OK)
  5. Click on “new page” button.  You can add up to 10 stand-along pages to your blog!
  6. Name your page and enter your copy.  The blogger tools you know and love are still available to you…adding photos, links, etc.
  7. Tip: click on “post options” below the post copy to turn comments on or off for each of your pages.  
  8. Click on “publish page”.
  9. You’ll have three options for how you’d like your pages gadget to appear.  Blog tabs will display your pages just below your header, like a traditional website.  Some may prefer the pages listed in the sidebar.  Most will want to choose one or the other.  If you are doing advanced editing to your blogger template and know html, you may wish to select “no gadget”.  For most of us, though, we’ll choose between the sidebar or tab layout.
  10. Click “save and publish”.  You’re all set!
Tip: To edit your pages later, you simple follow steps 1-4 above and then select the page you’d like to edit.  

Note: While you are editing a page, it will temporarily disappear from your navigation/sidebar.  As soon as you finish your edits, be sure to select “publish” so it re-appears.

I hope you enjoy adding pages to your blogger blog! It’s empowering to know that you can add pages to your blog without being a webmaster or programmer.  

I’ll be back tomorrow with some great Facebook Friday updates.

Laura


Laura Catherine Otero is a marketing professional and blogger in Charleston, SC who has been active in social media since 2005.  If you enjoyed this post, please consider subscribing to this blog via Email or  RSS. Laura can also be found on Twitter (@LauraCatherineO), Facebook, and LinkedIn

Thursday, February 10, 2011

How to Set-Up Your iGoogle Page: A "Tutorial Thursday" Post

If you read several blogs, you may benefit from setting up an iGoogle page.  What is an iGoogle page? An iGoogle page (your very own) allows you to follow all your favorite blogs on ONE page, in ONE place.  Super-handy. It has been a true time and sanity saver for me!

A Screenshot of My iGoogle page. Click to enlarge,
then use your back button to return to the blog post
(notice there are more blogs  below the fold).
I set up my iGoogle page in 2005.  My personal iGoogle page has evolved over the years (I’ve added and removed blogs as my interests have changed).  I’m sure there are new and neat features that I haven’t discovered yet.  I use it to read my fave blogs in one place. On this "Tutorial Thursday", I'm sharing a tutorial on setting up your customized iGoogle page…it’s worth the time to set-up and only takes a few minutes!

How To Set Up Your iGoogle Page
  1. Visit iGoogle.com
  2. Click on “Sign In” (on the top right-hand side of the page).  You’ll follow this step even if you don’t have an iGoogle account yet.
  3. Sign in.  For those who do not have an iGoogle account, create one by clicking on “Create Account Now” below the sign-in box. It’s just a few simple steps and you can use an existing email address!
  4. Click on “Add Stuff” towards the top right-hand side of the iGoogle page after you’ve signed in.
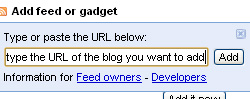
  5. Click on “Add Feed or Gadget
  6. A text box will appear for you to paste the URL (address) of the blog you’d like to add to your page.  For example, paste this blog address in the field: http://strategiconlinemarketing.blogspot.com.
  7. Click “Add”.  Just below the box, a confirmation will appear when the add is successful.
  8. Continue adding the URLs for the many blogs you’d like to follow.  You will need to add them one at a time, but it only takes a second.
  9. Click on “Back to iGoogle Home” (top left-hand side of the page) after you’ve added the blogs you wish to follow.
A Few Other iGoogle Tips…
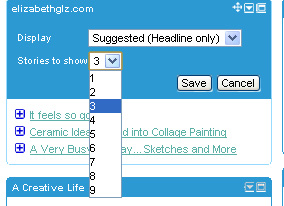
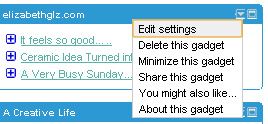
1. You can “edit” the “settings” of each of the blog feeds on your iGoogle page.  This comes in handy when you wish to set how many of the blog’s recent posts you wish to see.  You may wish to view 3 posts at a time, or maybe even 5 (or more).  I have mine set at 3. To do this, click on the arrow at the top right-hand side of one of the boxes on your iGoogle page.  Click on “edit settings”.  Select the number of posts you’d like displayed from the drop-down that appears.


2. You can re-arrange the boxes that appear for each of the blogs you follow.  To do this, click on along the top bar (on one of the boxes).  You should see an icon appear that looks like 4 arrows.  Hold down and drag. 
3. There are plenty of widgets you can add to your iGoogle page besides blogs…click on the same “add stuff” link on your iGoogle page to browse a variety of other widgets (weather, jokes of the day, quotes, etc.)

Laura Catherine Otero is a marketing professional and blogger in Charleston, SC who has been active in social media since 2005.  If you enjoyed this post, please consider subscribing to this blog via Email or  RSS. Laura can also be found on Twitter (@LauraCatherineO), Facebook, and LinkedIn